AstroPlotorium User Manual
Field of view
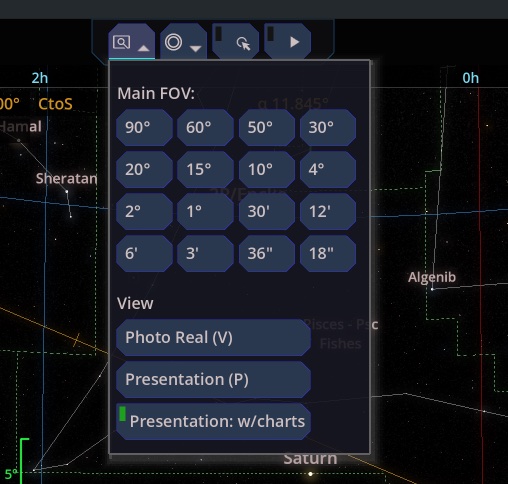
Open the view menu at the top center. Main FOV offers presets from 90° down to 18 arcseconds (90°, 60°, 50°, 30°, 20°, 15°, 10°, 4°, 2°, 1°, 30′, 12′, 6′, 3′, 36″, 18″).
You can also zoom with the mouse wheel, Page Up / Page Down, or Shift+Up / Shift+Down. Narrower is “in.” The current field of view is shown on the view’s information line.
A wide field is a sky survey. A field of a few degrees is a constellation. A field under one degree is a telescope view of a planet, a cluster, or a nebula.
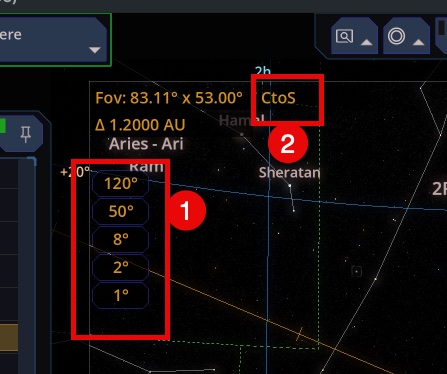 (1) are also button quickly change the FOV.
How the camera moves
A small label next to the field of view (2) names the camera mode.
- CtoS: Center to sphere. Sky views. You stay at the center and look around. Arrow keys and the mouse drag the view. Shift+Left and Shift+Right roll the camera.
Zlevels the roll. The ship keys (W A S D, R F, Q E) do nothing here. - OtoT: Orbit to target. 3D Universe while you are locked on an object. Arrow keys and the mouse orbit around it.
Rmoves closer andFmoves farther.Zlevels the roll. - Free-Fly. 3D Universe after you press
F6. The left hand steers the ship:W/Spitch,A/Dyaw,Q/Ebank,R/Fthrust along the nose. Arrow keys look around the cockpit and do not change your heading.Zsnaps your look back along the nose. The mouse wheel changes thrust speed. - Orbit-Fly. 3D Orbit. See 3D Orbit.
Y and H raise and lower camera speed (1 to 10, starting at 5). The speed number is on the information line. 3D Orbit keeps its own speed setting.
The top-center auto rotate button turns the camera slowly. It is a viewing aid, not an orbital motion.
Photo Real
V, or Photo Real in the view menu, hides every panel, label chrome, and chart so the sky fills the window. Grids and names that belong to the sky can be hidden with the layers first if you want a cleaner frame. Press V again to return.
In 2D Solar System and 2D Planisphere there is no photographic sky to reveal, so V toggles Presentation instead.
Presentation
P hides the toolbars and keeps a small title, the clock, and any script caption. Use it for a tour or a classroom screen. Presentation: w/charts keeps the side charts and the second 3D view if they were already on. Esc leaves presentation before it does anything else. Photo Real and Presentation do not stay on together.
On-screen indicators
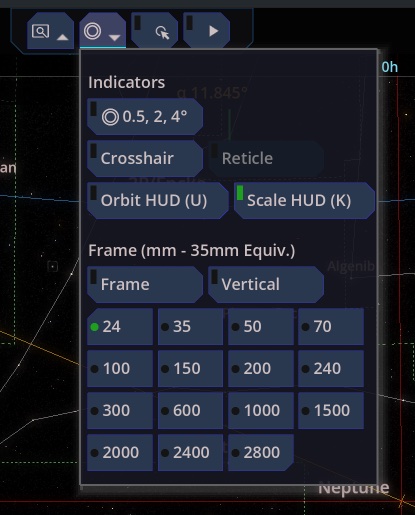
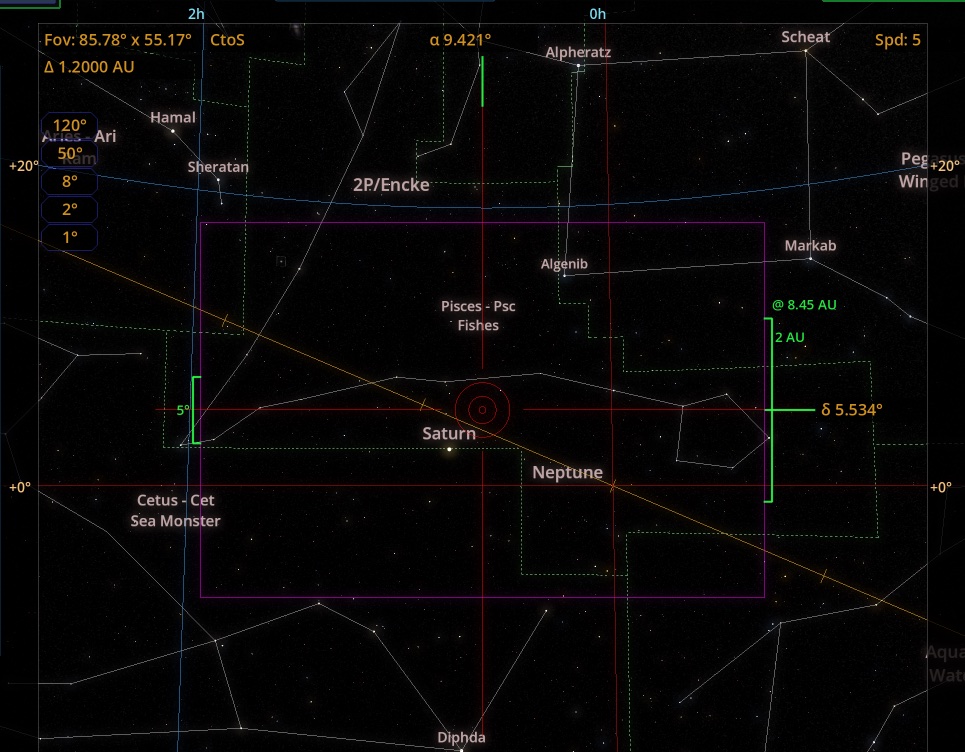
The indicator menu at the top center shows or hides measuring marks on the view:
- Circles at 0.5°, 2°, and 4°, for judging angular size.
- Crosshair on the aim point.
- Reticle for the selection point.
- Orbit HUD (
U). The flight tapes in 3D Orbit only. - Scale HUD (
K). Angular scale bars. They appear in the sky views, in 3D Universe, and in 3D Orbit. - Frame and Vertical. A rectangle in the shape of a camera frame. The focal length is a 35 mm equivalent: 24, 35, 50, 70, 100, 150, 200, 240, 300, 600, 1000, 1500, 2000, 2400, or 2800 mm. It tells you what lens that field of view corresponds to. It does not change the sky.
The information line can show the aim point (right ascension and declination, or longitude and latitude in 3D Orbit), the field of view, and the camera speed.
Below image shows all indicators on.
Rulers
Grid rulers sit on the edge of the sky and follow the coordinate system you have selected. If the numbers look like azimuth, you are in Horizontal. If they look like right ascension, you are in Equatorial. Change the system with the coordinate menu at the bottom right. See Location and coordinates.